# How to create a Contact Form with Recaptcha hosted on Netlify
**This post was first published on my [blog](https://blog.larsbehrenberg.com).*
One of the many handy features of hosting your website on Netlify is the option to have form submissions from your website showing right up in your Netlify dashboard. Or once activated, you can even have email notifications.
With the free tier on Netlify, this is limited to 100 submissions per site/month, but for most of my clients, this is more than enough. However, I have always found the Netlify Docs to this topic quite confusing, and especially the reCaptcha by Netlify hasn't worked for me.
So in this tutorial, we will go through the process of implementing a simple contact form with our own Google reCaptcha on Netlify.
**Let's get started!**
**As this tutorial is a step by step guide, I recommend you to go through it that way to understand the details, but if you don't mind, you can also find the whole code at the end of this article! This example uses Gatsby and "react-google-recaptcha"*
## Table Of Contents
- [Getting started with a basic contact form](#getting-started-with-a-basic-contact-form)
- [Add the Netlify data attribute to your form element](#add-the-netlify-data-attribute-to-your-form-element)
- [Get your own reCaptcha key](#get-your-own-recaptcha-key)
- [Add *"react-google-recaptcha"*](#add-react-google-recaptcha)
- [Don't forget to disable submit unless reCaptcha is approved](#dont-forget-to-disable-submit-unless-recaptcha-is-approved)
- [Add email notifications](#add-email-notifications)
## Getting started with a basic contact form
To get you started, you will need a basic contact form with a name, email, and message field. And React state will preserve the user's input on change. Notice that in our **handleSubmit** function we use Gatsby's **navigate** function to redirect the user to **/thank-you**. *This is the only Gatsby related thing in this example.*
```jsx
import React from 'react'
import { navigate } from 'gatsby'
const ContactForm = () => {
const [state, setState] = React.useState({})
const handleChange = e => {
setState({ ...state, [e.target.name]: e.target.value })
}
const handleSubmit = e => {
e.preventDefault()
const form = e.target
fetch('/', {
method: 'POST',
headers: { 'Content-Type': 'application/x-www-form-urlencoded' },
body: encode({
'form-name': form.getAttribute('name'),
...state,
}),
})
.then(() => navigate(form.getAttribute('action')))
.catch(error => alert(error))
}
return (
)
}
export default ContactForm
```
## Add the Netlify data attribute to your form element
Now for the contact form to show in your Netlify dashboard, you will have to include the Netlify data attribute. This way Netlify can know during deployment that there is a form it needs to pay attention to.
```jsx
// ... imports here
const ContactForm = () => {
// ... all the previous code
return (
)
}
export default ContactForm
```
## Get your own reCaptcha key
Before we get to implement our reCaptcha component in our contact form, we will have to get our free Recaptcha key from Google. Conveniently, as usual, anybody with a Google account can create one [here](https://www.google.com/recaptcha/admin/create).
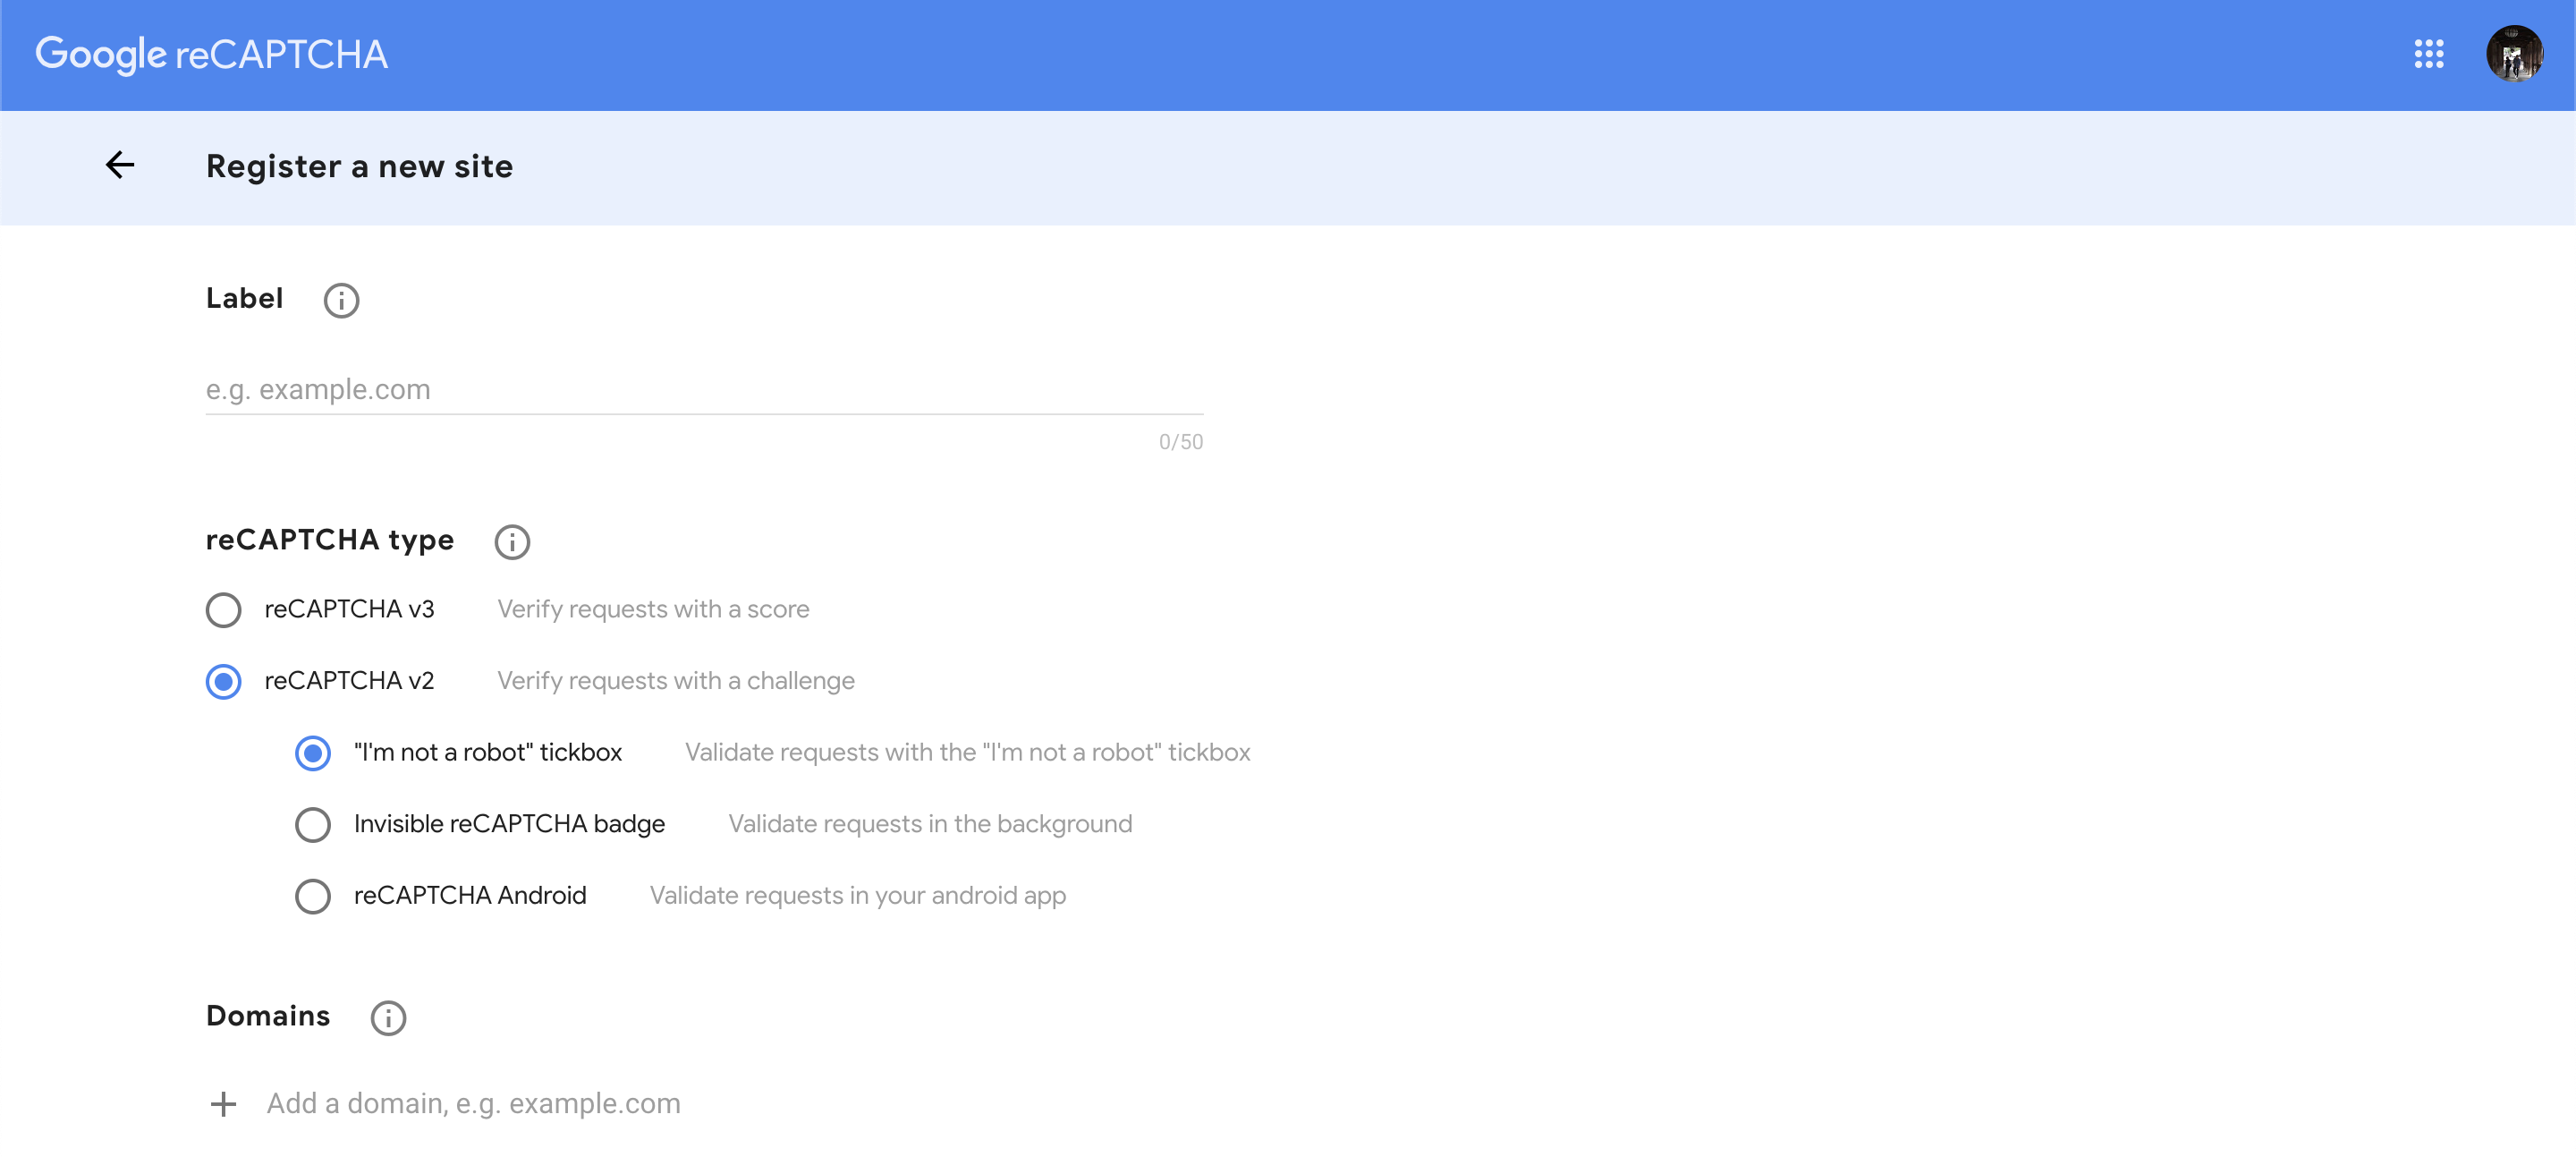
**Note here: Make sure to check reCaptcha v2 and "I'm not a robot" tickbox, as this is what we use in our example.**
If you want to use the invisible reCaptcha badge, you can find the [documentation here](https://github.com/dozoisch/react-google-recaptcha#invisible-recaptcha), or for reCaptcha v3 you can check out [react-google-recaptcha-v3](https://www.npmjs.com/package/react-google-recaptcha-v3).
Once you have registered, you will see your **pair of reCaptcha keys**:
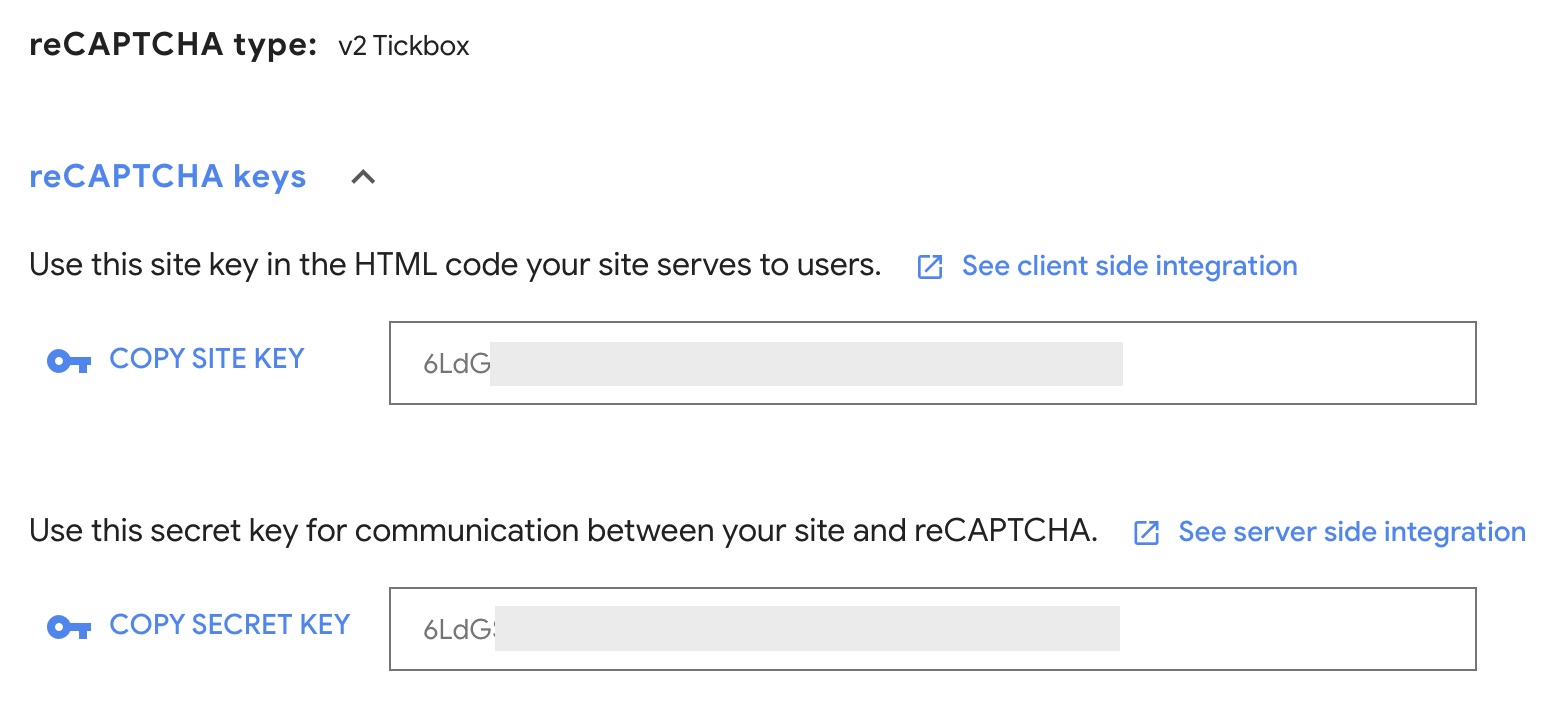
**In our case, we will only need the SITE KEY!**
So go ahead and copy your key. And since it is a public key, we can safely create a variable in our component like so:
```jsx
// ... imports here
const RECAPTCHA_KEY = '6LdGSewdkljsdakldasdklj3e2asddaDDS9083'
const ContactForm = () => {
// ... previous code here
return (
// ... previous code here
)
}
export default ContactForm
```
## Add *"react-google-recaptcha"*
With our **RECAPTCHA_KEY** at hand, we can now install the *[react-google-recaptcha package](https://github.com/dozoisch/react-google-recaptcha)*, which will handle most of the reCaptcha stuff for us.
```jsx
yarn add react-google-recaptcha
```
or
```jsx
npm install react-google-recaptcha
```
But to ensure that the reCaptcha talks to our contact form and submissions won't be submitted without reCaptcha's approval, we have to write **a little more code on our own.**
I'll give you the pieces of code first and afterward, you will find the example with the new parts implemented.
**Our Recaptcha component:**
```jsx
import Recaptcha from 'react-google-recaptcha'
// ... stuff in between
return (
// ... stuff
)
```
**Netlify Recatpcha data attribute:**
```jsx
data-netlify-recaptcha="true" // new Netlify data attribute
```
**The recaptchaRef:**
```jsx
const recaptchaRef = React.createRef() // new Ref for reCaptcha
```
The new **handleSubmit** function including **reCaptchaValue.**
```jsx
const handleSubmit = e => {
e.preventDefault()
const form = e.target
const recaptchaValue = recaptchaRef.current.getValue()
fetch('/', {
method: 'POST',
headers: { 'Content-Type': 'application/x-www-form-urlencoded' },
body: encode({
'form-name': form.getAttribute('name'),
'g-recaptcha-response': recaptchaValue,
...state,
}),
})
.then(() => navigate(form.getAttribute('action')))
.catch(error => alert(error))
}
```
**And here the whole example:**
```jsx
// ... other imports here
import Recaptcha from 'react-google-recaptcha'
const RECAPTCHA_KEY = '6LdGSewdkljsdakldasdkljasdda'
const ContactForm = () => {
const [state, setState] = React.useState({})
const recaptchaRef = React.createRef() // new Ref for reCaptcha
const handleChange = e => ...
const handleSubmit = e => {
e.preventDefault()
const form = e.target
const recaptchaValue = recaptchaRef.current.getValue()
fetch('/', {
method: 'POST',
headers: { 'Content-Type': 'application/x-www-form-urlencoded' },
body: encode({
'form-name': form.getAttribute('name'),
'g-recaptcha-response': recaptchaValue,
...state,
}),
})
.then(() => navigate(form.getAttribute('action')))
.catch(error => alert(error))
}
return (
)
}
export default ContactForm
```
## Don't forget to disable submit unless reCaptcha is approved
Now after I had come to this point, I noticed that even without submitting reCaptcha, the user would be able to press the submit button and get past the check. This was **no good**. So I need to ensure that the button was disabled as long as the user hadn't pressed the reCaptcha check.
Luckily [react-google-recaptcha](https://github.com/dozoisch/react-google-recaptcha) provides us with an onChange function that allows you to set a React state for the submit button, like so:
```jsx
// ... imports here
const ContactForm = () => {
// ... other React State and Ref
// With this the button is disabled by default, but on Recaptcha change, the form can be submitted
const [buttonDisabled, setButtonDisabled] = React.useState(true)
// ... previous code
return (
)
}
export default ContactForm
```
Now on top of this, you might want to consider **adding some CSS** to let the user know when the button is disabled:
```css
button[disabled] {
cursor: not-allowed;
}
```
## Add email notifications
Last, but not least, we probably don't want to randomly check our Netlify dashboard for submissions, but instead, get automatic email notifications.
For this login to your [Netlify dashboard](https://app.netlify.com/), and in your site settings under Form and Form notification, you can set your preferences.
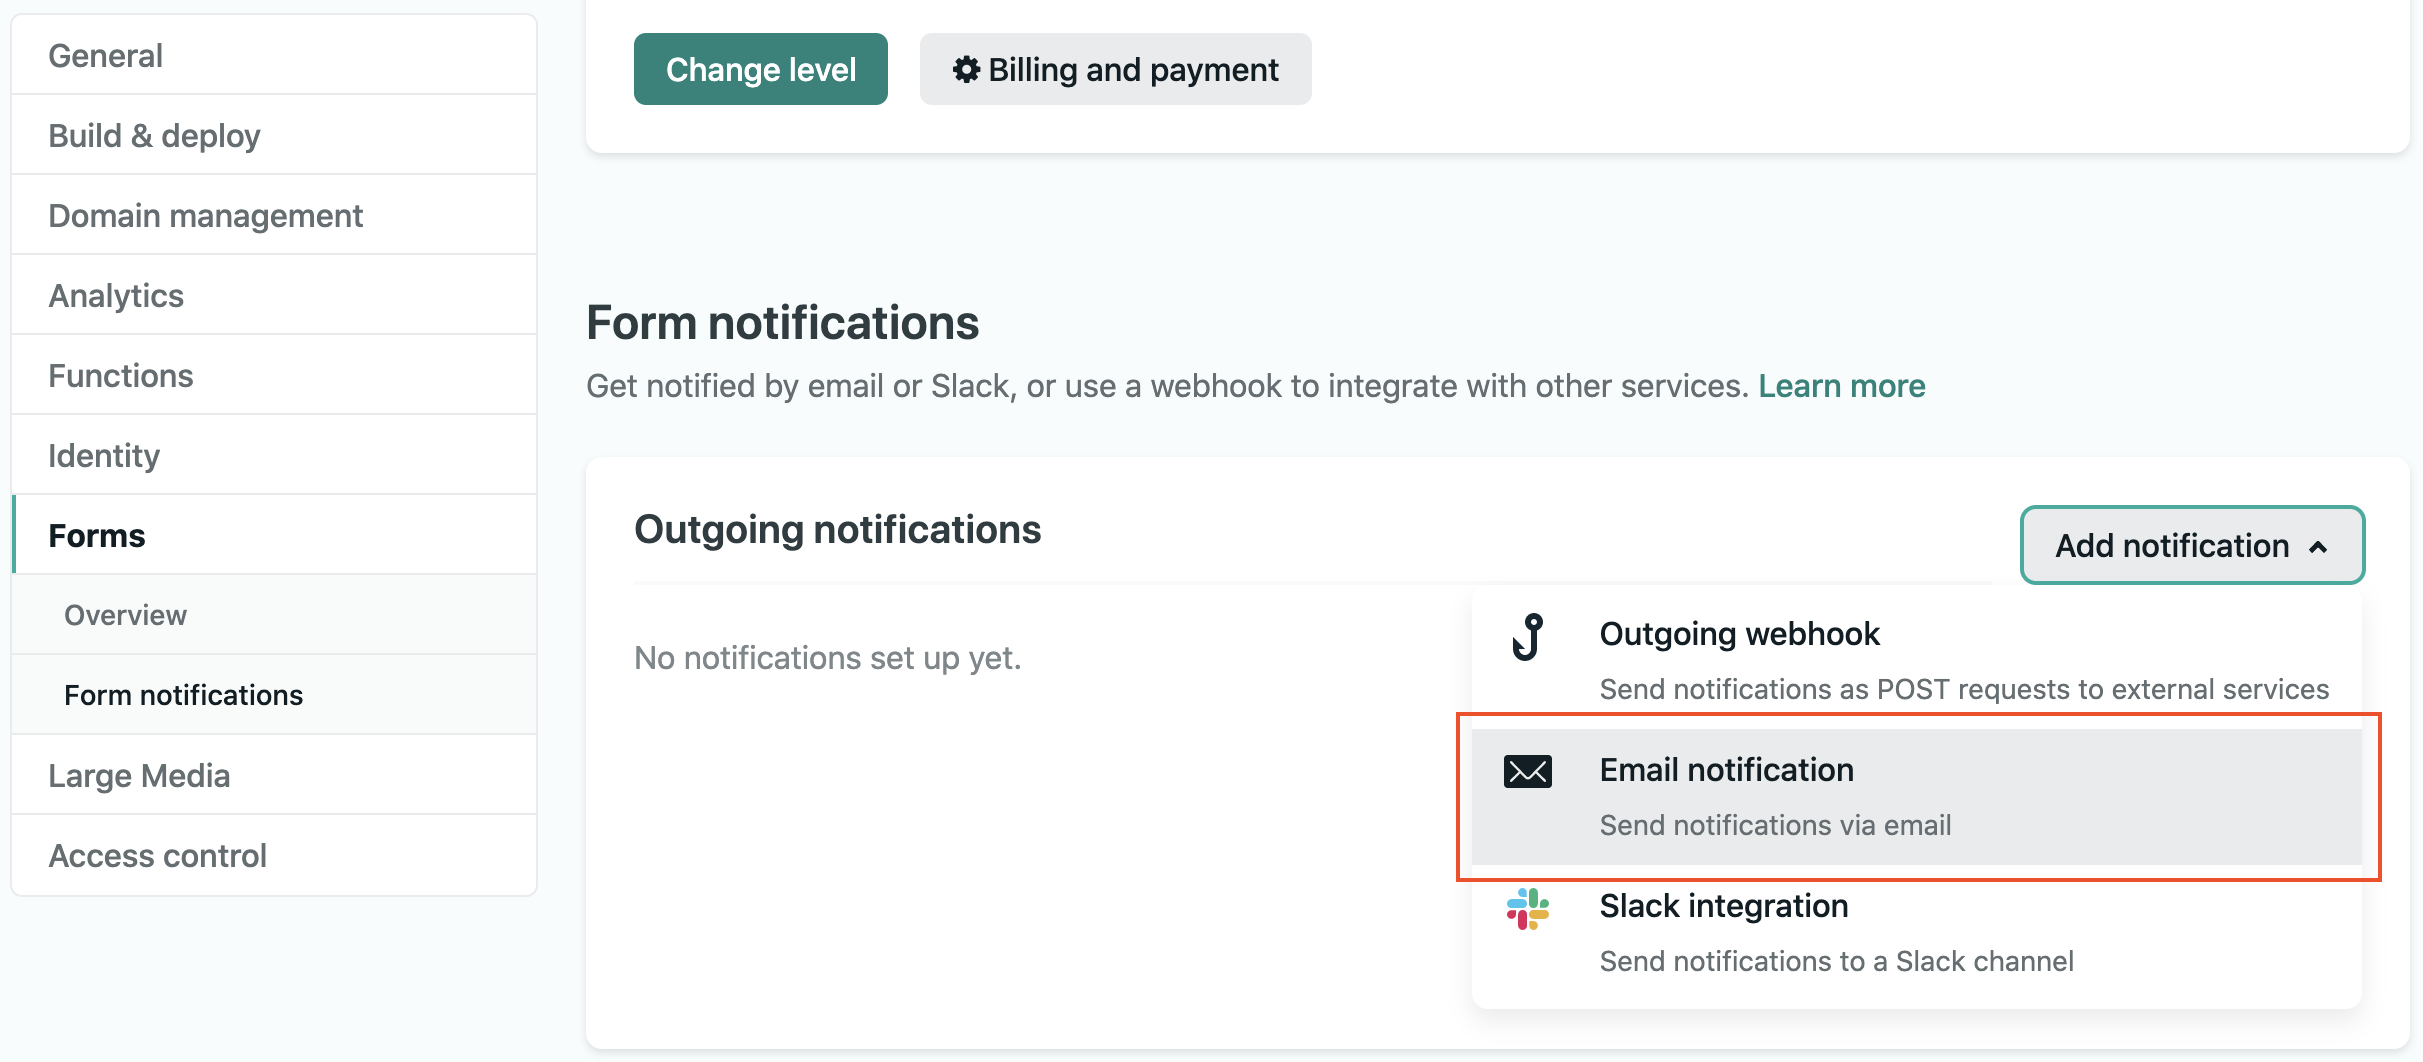
You can find below the final code and with some styling, you have yourself a free and safe, working contact form on Netlify!
## Final result:
```jsx
import React from 'react'
import { navigate } from 'gatsby'
import Recaptcha from 'react-google-recaptcha'
const RECAPTCHA_KEY = '6LdGSewdkljsdakldasdkljasdda'
const ContactForm = () => {
const [state, setState] = React.useState({})
const recaptchaRef = React.createRef()
const [buttonDisabled, setButtonDisabled] = React.useState(true)
const handleChange = e => {
setState({ ...state, [e.target.name]: e.target.value })
}
const handleSubmit = e => {
e.preventDefault()
const form = e.target
const recaptchaValue = recaptchaRef.current.getValue()
fetch('/', {
method: 'POST',
headers: { 'Content-Type': 'application/x-www-form-urlencoded' },
body: encode({
'form-name': form.getAttribute('name'),
'g-recaptcha-response': recaptchaValue,
...state,
}),
})
.then(() => navigate(form.getAttribute('action')))
.catch(error => alert(error))
}
return (
)
}
export default ContactForm
```
## That’s pretty much it!
Thanks so much for reading this far and feel free to reach out to me anytime, on [my website](https://larsbehrenberg.com/) or [Twitter](https://twitter.com/codetraveling) 🙂 And if you like to read more, make sure to check out my other posts on my [blog](https://blog.larsbehrenberg.com)!