


With the rise of the JAMStack and the serverless approach, most of the things that used to require a backend are now handled completely on the front-end or through APIs. But sometimes this is not enough, and that's where "serverless functions" come in.
Let's go and have a look at it. What are some use cases for serverless functions and how do you set them up?
Quick note: There are many different providers to run your serverless functions like AWS Lamda, Azure Functions, or Google Functions. However, in this tutorial, we will be using Netlify as it offers one of the most user-friendly experiences to set up and run your environment.
Table Of Contents
- What are serverless functions?
- What can you do with serverless functions?
- Getting started with Netlify Functions
- Trigger a serverless function and receive a response
What are serverless functions?
One thing to get right from the start, "serverless" can be a little bit misleading, as a server is needed to execute your functions. A good way to think about it is that back in the day you needed to spin up your own server, maintain it and pay for it 24/7 to run any functions.
However, now with the "serverless" option, this has changed to a "pay as you go"-approach, meaning on-demand computing. Pay a provider like Netlify, for each execution of your functions and not a server in general.
Another main advantage of this is that you don't need to worry about your server infrastructure anymore and whether everything will be fine if you have a sudden increase in users.
Scaling your applications has just become a lot easier.
Serverless functions are the missing piece in the serverless approach of the JAMStack. It allows you to integrate any missing features that you couldn't handle with statically rendered pages.
What can you do with serverless functions?
Here is a list of a few of them:
- Talk to any API
- Run Data/Image processing
- Utilize user authentication
- Integrate 3rd party services (Ecommerce, etc.)
- Send Emails
This enables us to do a variety of things! So let's have a look at what we need to get started!
Getting started with Netlify Functions
Netlify has put a lot of effort into making the deployment process on their platform one of the easiest out there. You can either get started with one of the many example repos that Netlify has put together for you or you read further below to learn how to set up Netlify's Serverless Functions in your project on your own.
Prerequisites
First, we want to install the Neltify CLI. This will allow us to test our serverless functions locally instead of having to deploy every time we make a change. If you don't have it installed yet:
npm install -g netlify-cli
Set up your folder structure
To get started all you need to do is configure a folder with all your functions inside and that folder will automatically be exposed as a web endpoint under the site-relative path. The default is netlify/functions/. But you can simply change that by going into the Netlify web interface under "Deploy Settings". Or create a Netlify configuration file ( netlify.toml) in your project.
[build]
  functions = "serverless_functions"
Find more details on the topic here.
Create a serverless function
Next up, we want to create a function in our functions directory. For example:
serverless_functions/fetch-weather.jsserverless_functions/stripe-payments.jsserverless_functions/handle-user-input.js
These will later be available relative to the base URL of your site at: /.netlify/functions/fetch-weather or /.netlify/functions/stripe-payments or /.netlify/functions/handle-user-input
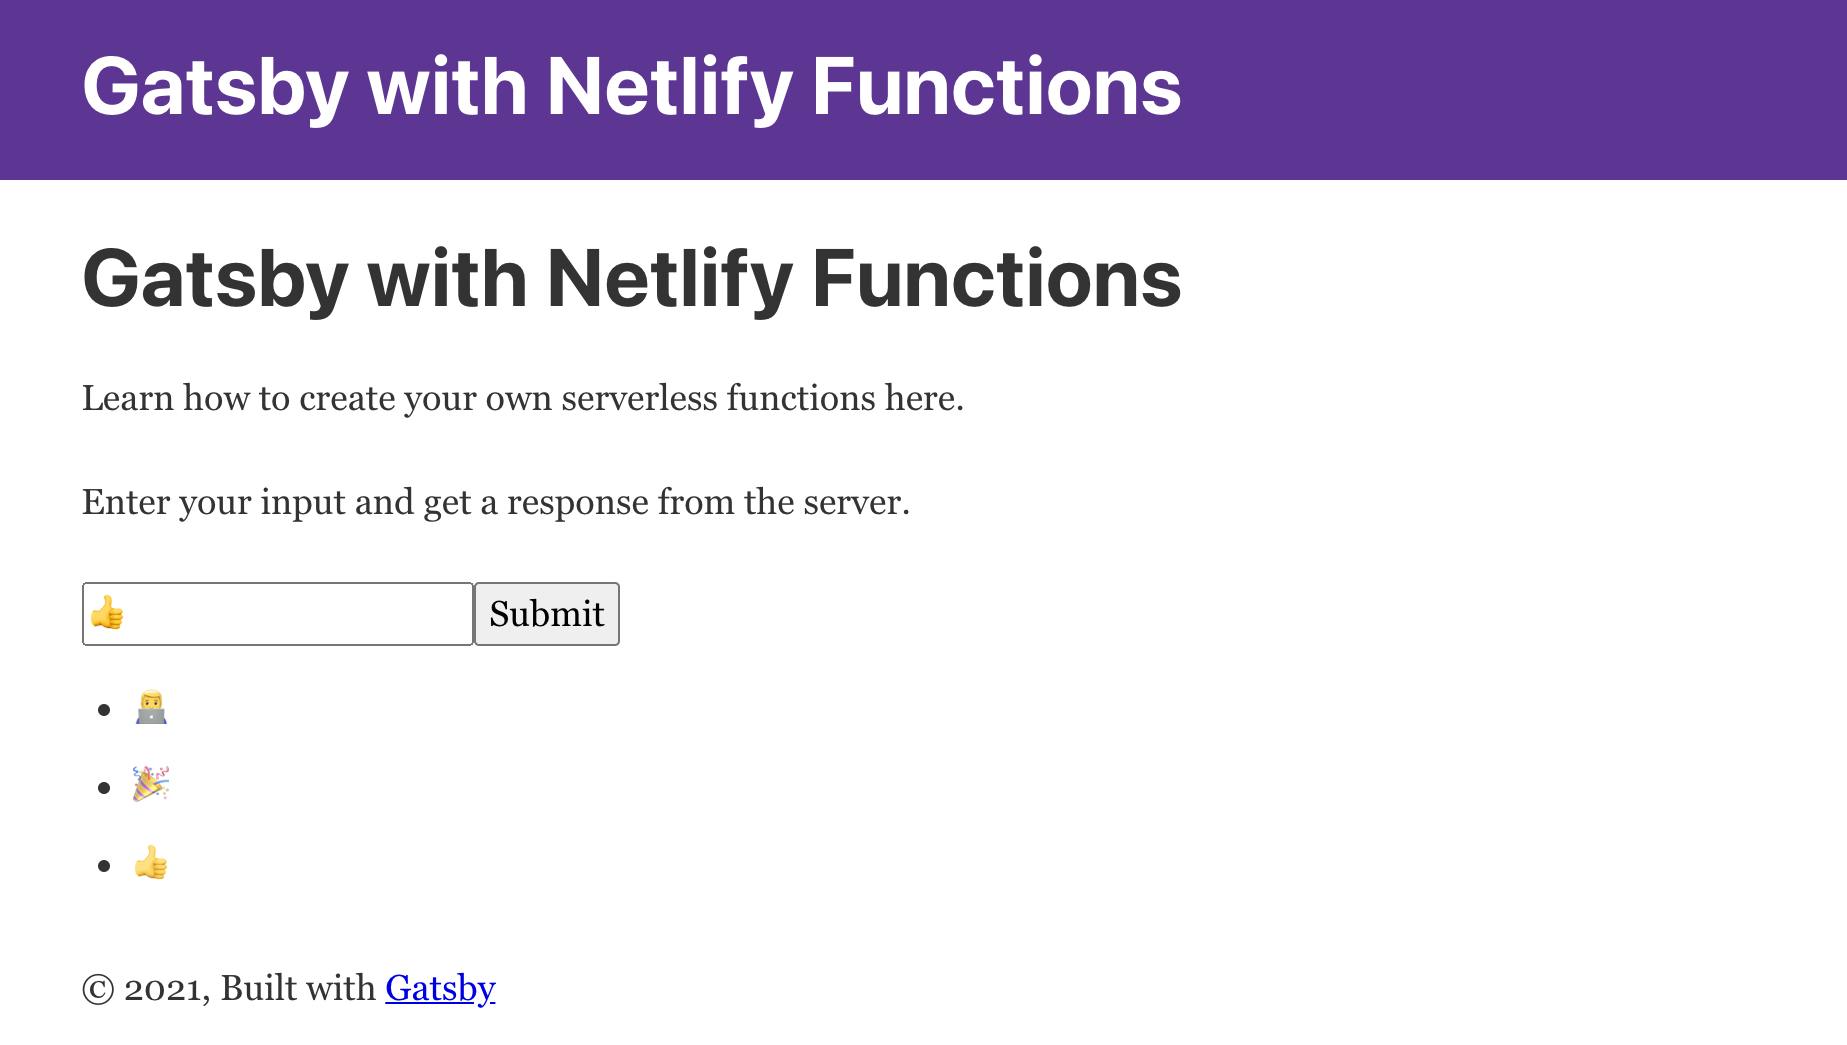
In today's example, we want to take a user input, sent it to our function, and display the response for the user.
For that we create a function at serverless_functions/handle-user-input.js:
exports.handler = async function (event) {
  return {
    statusCode: 200,
    body: `${event.queryStringParameters.input || "No input found"}`,
  }
}
As we have learned earlier our function will be available at .../.netlify/functions/handle-user-input, but how do we pass arguments to it?
Of course, with URL parameters!
Like so .../.netlify/functions/handle-user-input?myparameter=somevalue .
Then we read the value by accessing queryStringParameters in the event object. In our case, the parameter we pass will be called "input".
Trigger a serverless function and receive a response
Now that we have set up our serverless function, our users need to able to trigger it.
It is as simple as fetching data from an API.
/* ... imports etc. */

const IndexPage = () => {
  const [input, setInput] = React.useState("")
  const [allInput, setAllInput] = React.useState([])

  const handleSubmit = () => {
    if (input) {
      fetch(`/.netlify/functions/user-input?input=${input}`)
        .then(res => res.text())
        .then(text => setAllInput([...allInput, text]))
    } else {
      window.alert("Please give me some input! 😥")
    }
  }

  return (
    <Layout>
      <input value={input} onChange={e => setInput(e.target.value)} />
      <button onClick={handleSubmit}>Submit</button>
      <ul style={{ marginTop: "1rem" }}>
        {allInput.map((item, index) => (
          <li key={`${index}-${item}`}>{item}</li>
        ))}
      </ul>
    </Layout>
  )
}
Three things are happening here:
- We have an input field for users to enter any information and store that input using React's useState hook.
- We have a button to trigger the serverless function together with our input value using URL parameters. Then, when we receive a response, we add that string, to our array of responses called "allInput". Again, using React's useState hook for this.
- Lastly, we map through our array of responses and display any items in that list with an unordered list.
And that's it! You might feel like it's a little bit redundant to send the user's input through a serverless function, just to receive it again. But just think of all the different opportunities that this opens up for us! It's a powerful tool that allows you to turn your static site into a pretty much dynamic one! Let me know in the comments if you already have an idea of what you want to try and built with it!
That’s pretty much it!
Thanks so much for reading this far and feel free to reach out to me anytime, on my website or Twitter 🙂 And if you like to read more, make sure to check out my other posts on my blog!